Automating Note Upload to Google Sheets using iOS Shortcuts
This guide outlines the steps to create an iOS Shortcut that scrubs your Notes app for specific notes and uploads their content to a Google Sheets page for review.
Caveats
Running this will require manually running the shortcut. To make it fully automatic by setting a trigger - More
This will only work on Wifi - Cellular network try blocking / filtering / rejecting the requests entirely - More
Prerequisites
An iOS device (iPhone or iPad) with the Shortcuts app installed.
A Google account with access to Google Sheets.
A new Google Sheet created to receive the note data. It's recommended to have at least two columns: one for the note title and one for the note content.
Step-by-Step Guide
Step 1: Create a New Shortcut
Open the Shortcuts app on your iOS device.
Tap the + icon in the top right corner to create a new shortcut.
Tap Add Action.
Step 2: Find Notes
In the search bar, type "Find Notes" and select the Find Notes action.
Tap Add Filter.
Configure the filter to specify which notes you want to find.
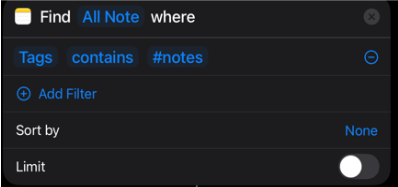
For example:
“Tags Contains #notes”: To find specific notes with specific tags. The tag needs to first be created in Notes.
"Title Contains [specific keyword]": To find notes with a certain word in their title.
"Folder Is [folder name]": To find notes within a specific folder.
You can add multiple filters using "and" or "or" conditions.
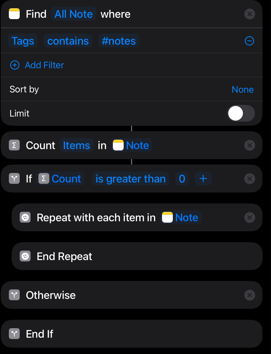
Step 3: Loop Through Found Notes and Get the Notes Contents
First you have to count each note that is found. This is to determine how many loops it needs to go through.
In the search bar, type "Count" and select it.
The variables should auto fill, but verify it counts each of the notes

In the search bar, type "If" and select it.
This creates the IF statement that everything functions within.
Set the “Condition” to “Count”, and set the number to 0.
This checks to see if the variable “Count” has counted any notes. If there isn’t one, it skips to the “Otherwise” statement.

In the search bar, find “Repeat with Each”
Click-Hold-Drag and place directly under the start of the IF statement.
Select the variable and clear it
Click it again and set the variable to “Note”
This will cause it to repeat with each Note it originally found.
In the search bar, type “Get Text From Input” and select it.
Click-Hold-Drag and place directly under “repeat with each item..”
It should auto update the variable to “Repeat Item”.

This completes the foundation of the script. The next steps will require some “scripting” within google scripts. This will create the connection.
Step 4: Google Sheets Setup + Webhook
Open up google sheets - a new or existing sheet will work.
Click “Extensions” and then “Apps Script”.

You will start with a blank function - delete it and insert the following: CODE

You then need to make 2 adjustments. The Token and the Sheet/Tab name.
This script is associated with the sheet you created, it doesnt care what the name of the document is.
“Const Sheet” should be set to whatever you name the sheet tab you will be putting the data. The name can be anything.


The second step is to update the Token. This is a security measure so that only someone with the same key can access and use this webhook.
This can be anything, I would recommend a very strong-like password. This can be randomly generated with any free password generator.
Set the “const expectedToken” to this password.

In the top right corner - select “Deploy”, “New deployment”.

Select deployment type - Web app

Fill in the Description field
This is for visual reference only
Leave “Execute as”.
Set “Who has access” as “Anyone”.
This is why we set the token. You can not set this as anything else, due to how the hook accepts information.
Even though the information is being sent by you - technically your phone is sending it as an anonymous request.
Click “Deploy”

COPY the web app URL and send it to yourself.
This will be going into the put into your shortcut.
Step 5: Shortcut setup - Continued
Google Sheets API typically expects data in a structured format, often as a comma-separated value (CSV) or JSON.
Back to your shortcut - Search for add “Get Contents of URL”
Click-Hold-Drag and place directly under “Get test from…”
Clear the variable - click the drop down
Under “Request Body” - click “Add new field” – TEXT
add 2 new fields.

In the URL field, insert the url that you copied from your script deployment.
In the Request Body
Key #1 - There is were you are adding the token your created in the script - no “”
Key: auth
Text: “yourtoken”
Key #2 - this is the body of what you are sending google sheets
Key: note
Text: the “text” variable from the “Get text from Repeat Item”

Step 7: Add Confirmation and/or Delete (Optional)
In the search bar, type “Show Result” and select it.
Click-Hold-Drag and place directly under “Get contents of … “.
It should auto update with the correct variable.
In the search bar, type “Delete Notest” and select it.
Click-Hold-Drag and place directly under “Show … “.
Delete the variable - now click and hold to set the new variable - set to “Repeat Item”.

Step 8: Finish the Loop logic
In the search bar, type “Show Result” and select it.
Click-Hold-Drag and place directly under “Otherwise “.
Set the variable - something that will notify you if no notes were found.

Step 9: Name and Test Your Shortcut
Tap the name of the shortcut
You can edit the name or icon with the dropdown

If you are on your phone - click “Done” at the top right - then the play at the bottom right to test the shortcut.

If you are on your tablet - hit the play button at the top right

Troubleshooting Tips
Google Sheet Format: Double-check that your Google Sheet columns align with how you are sending the data from the "Text" action.
Filters: Verify your "Find Notes" filters are correctly set to capture the desired notes.
Internet Connection: An active internet connection is required to upload data to Google Sheets.